I love making pancakes for people, or at least mixing up the batter and having the Wife cook them, which I have recently been schooled on so I can do it. I can't count the times I have been without my recipe and have to search the inter webs for it, so I have posted it on my blog where I can find it while traveling.
I used to have a waffle recipe that involved whole wheat flour, but when I had some pancake batter left over I made a waffle with it and thought it was better than the waffle recipe so I now use pancake batter for both.
Here are the instructions for making them.
First of all, if you don't have buttermilk go buy some, or you can ruin the pancakes by trying to substitute with other substances. Dry buttermilk is nasty for this, go buy some. Vinegar and milk doesn't work either, go buy the real deal or just stop reading this now.
IF YOU DON'T HAVE FULL FAT BUTTER MILK GO BUY SOME!!!
Mix Wet (All ingredients should be at room temp, eggs, milk) melted butter
Mix Dry Separately
Fold Dry into Wet, you want a lumpy consistency, which is why you don't mix them, YOU FOLD THEM.
LET ME SAY THAT AGAIN, FOLD THEM TOGETHER, don't mix out all the lumps or you'll ruin them like he who shall remain nameless did.
Now let the batter sit for a MINIMUM of 15 minutes.
Your batter should still be lumpy, ITS OKAY, it is SUPPOSED TO BE!
If you're batter isn't lumpy you've ruined it and the pancakes won't rise.
Now you throw the batter on the griddle and make flapjacks.
4 cups all-purpose flour
2 teaspoon baking powder
1 teaspoon baking soda
2 teaspoon salt
6 tablespoons sugar
5 large eggs
4 cups buttermilk (at room temperature)
1 stick butter melted
Note to self, this recipe is doubled.
Multiply the current recipe as written by 2.5 for a group of 20.
Medical School at Big Red has really put the hurt on this blog.
I had some time between exams and tried this out.
This woman is awesome, and so is this drink. It's one of those things in life that is worth the hassle, but it is not really that much of a hassle to make.
Once you make this yourself you'll never go back to that nasty air puffed drivel.
INGREDIENTS:
VANILLA EXTRACT
HEAVY WHIPPING CREAM
SUGAR
First pour your whipping cream into the mixer and start it a mixing on hight. Wait until it starts whipping up and then add vanilla to taste and sugar to taste.
When adding sugar it is imperative that you sprinkle it in VERY slowly.
If you don't your sugar will fall to the bottom and will not be incorporated.
Don't over whip the cream or it may fall and you will get butter, but that shouldn't happen unless you walk away and leave the mixer on high for several minutes. If that happens you'll have to start over but at least you'll have some delicious butter and sweet vanilla buttermilk.
Now that you're an expert whipper, you'll never go back to the air whipped nasty at the coffee shop, which in all honesty is fine for coffee but not suitable for pie.
I never knew how many people love this stuff until I started making it.
I had heard of KLP but never really seen any that looked good enough to try. They were all green and slimy and think looking which dissuaded me trying them, so I thought I would look into it for myself.
The first thing I learned is that KLP is made with key lime juice, now a key lime is different from a persian lime in that it is much smaller, less juicy, and more expensive. I have made pies with both and can not tell the difference. If you can good for you, don't eat my pie, but we can both agree KLP should be yellow. Yes I said yellow, that is because a bowl of lime juice is yellow and not green. If I am presented with a green KLP I will turn my nose, or at least give the maker an education so they can stop embarrassing themselves, and picking people with food coloring.
I also learned while living in Kodiak, Alaska that you can make this pie with equal results using your everyday lemon if limes are unavailable.
Folks are often surprised by how easy this pie is to make.
INGREDIENTS:
6-8 Persian Lime, or a bag of Key Limes
2 cans sweetened condensed milk
6 egg yolks
1 box of Graham crackers
First Let us start off with making the crust, an easy task. You can buy your Graham crackers already crusted but I prefer to do it myself with the KitchenAid. I used to smash them in a plastic bag, but always ended up with lumps and broken bags leaking crumbs. With the KitchenAid food grinder I get perfect powder every time.
Here is another horrible thing when dealing with Graham cracker recipes. No one ever clarifies what they mean. Well when I say you need 25 of these for a crust you know what I mean. Yes, 25 is a lot, but you don't want your crust to be too thin.
Now comes the butter. I like to use a stick and a half for each crust.
Melt your butter (by cutting it into small chunks first, so it doesn't explode in the microwave) and pour it in the crumbs.
Mix it until it looks like this.
Shape is until it looks like this.
Set your crust aside and prepare to smash some citrus.
This is how I do it. I used to just squeeze the lime, but this is much faster and less work. Plus I get to use the the RedHead.
Ta Daaa! A whole effortless bowl
Now for the filling.
Crack your eggs in a bowl and then pull the yolks out and put those yolks in with the sweetened condensed milk, or separate however you want.
I know, there are more than six eggs but I'm making more than one pie.
Now whip them into one delicious liquid. After they are combined pour your lime juice in and watch the acidity of the lime curdle the sweetened condensed milk. Don't resist the urge to taste it, I always do and I am yet to die.
Now pour this into the crust, put it in a preheated oven of 350F for 20 minutes, and chill before serving.
The Great Dr. PhD told me of a storied sauce he likes to top his pie with. RASPBERRIES!
You need sugar and raspberries you figure out the rest.
Put it on the pie and enjoy, or top with whipped cream. You can see that post for making it yourself. If you put store bought whipped nasty on your pie don't ever read this blog again, it's over your head
How did I end up with "Mexican" deviled eggs? Well, we have had "Mexican" food for Thanksgiving for the past few years. I look forward to Satanic Eggs each fall, but realized that without traditional Thanksgiving food I was stuck, so this year I decided to slip them in. I went to the interweb and looked for a recipe and found lots of recipes that contained everything for regular Satanic Eggs with the addition of jalapenos.
I wasn't surprised by the laziness of these recipes so I made my own.
FIRST boil a load of eggs, peel, cut in half, and remove yolk.
Now mix the yolks in a bowl with the follwoing.
minced onion
minced cilantro
Valentino or Chalula sauce
Sour Cream
Chile Powder
minced tomato
minced garlic
adobo
salt
Next take one pickled jalapeno and place it in the hollow egg white. Then fill the egg with the yolk mixture. Don't tell your guests of the jalapeno, because it makes for great conversation. Put a big fat black olive on top. Finally sprinkle with paprika and cayenne pepper. Again, no need to mention the cayenne pepper.
Sadly I have come to realization that there is no frosting that you can buy at a grocery store that is worth eating. I remember as a kid my aunt coving Graham crackers in white glaze and sending me happily on my way to sugar land, but as I have gotten older I just can't stand the stuff. So, I tried to do it myself and the results were spectacular.
Plus, the end product is easier to spread on whatever you may like than the store bought. Seriously, that stuff is like spreading plumbers putty.
The first and most important step is to let the cream cheese and butter sit out long enough to reach room temperature. Overnight is your best bet, and contrary to what the germ police might have to say butter and cream cheese do fine if you leave them out overnight. Now, if you try to heat them up quickly so you don't have to wait go for it, but when you have melted butter and cream goo, just remember OVERNIGHT is your best bet. I always use unsalted butter, because I hang with some people who can't handle their salt (me included) I'm sure salted butter will work just as well.
For a double decker 9" cake I triple the recipe above.
Now put your butter and cream cheese into a mixing bowl and combine. You can use a wooden spoon, but I prefer to use my KitchenAid hand mixer, don't try this in the KitchenAid stand mixer, it's a nightmare.
The next step is to add the vanilla and powdered sugar. I have seen some recipes call for a whole cup of powdered sugar, but I like to add a lot less than that. I like to be able to taste the cream cheese, but whatever floats your boat.
Congratulations you are now the proud new owner of an off-white wonder!
Spread this on a cake, cookies, waffles, pancakes or even just your fingers and enjoy!
If you want to get picky about the icing/frosting debate have a read here:
I found this great video from a wonderful woman who has great videos that will teach you how to make real Mexican food. Please see this video on how the bread the Chiles, I have left the way I do it in so you can choose which one you want to try. I am yet to try this new method, but will likely switch to it as it makes much less of a mess.
WARNING: Careful where you put your hands while making this, and if you can wear gloves.
Have you ever been to a mexican restaurant and ordered one of these?
Well, let me back up.... way back in graduate school I had the opportunity to go to Mexico to look at the overwintering site of the Monarch butterfly. Yeah, it was amazing and you should do it if you get a chance, but let me tell you what else was awesome. THE FOOD!! I specifically recall this dish I tried for the first time called the chile relleno (pronounced ray-ay-no). It was amazing so naturally when I gat back to states I wanted to eat another. I ordered one in a local "mexican" restaurant and thought it was alright but not as good as the one I had in mexico. I thought I would just go to another restaurant and see if they had better ones. A few tries later at different restaurants had me confused because no matter where I went they were all eerily the same. So I went to Mexican food mecca, Mi Cabanita to get one, but they don't sell them.
I knew something was wrong! If the Cabanita doesn't sell it you usually don't want it, but I wanted one so of course I would just have to do it myself.
I enlisted the help of Dr. Chiro and MutherMusk and after a few attempts I have ironed out the details of making the chiles, which are almost as good as the one I had in Mexico.
Now back to the eerily similar chiles I was getting in restaurants. Once I figured out how long it took to make these (they are worth the effort) I realized the ones in the restaurants are frozen. They are made in a factory somewhere! This epiphany explained why they were all the same no matter where I went.
Here is a list of ingredients.
Poblano Peppers
Your favorite frying oil
Your favorite rice
Onions
Your favorite meat
Masa Harina or just plain old flour
Your favorite cheeses
The lion's share of the work is done in prepping the peppers so prepare yourself.
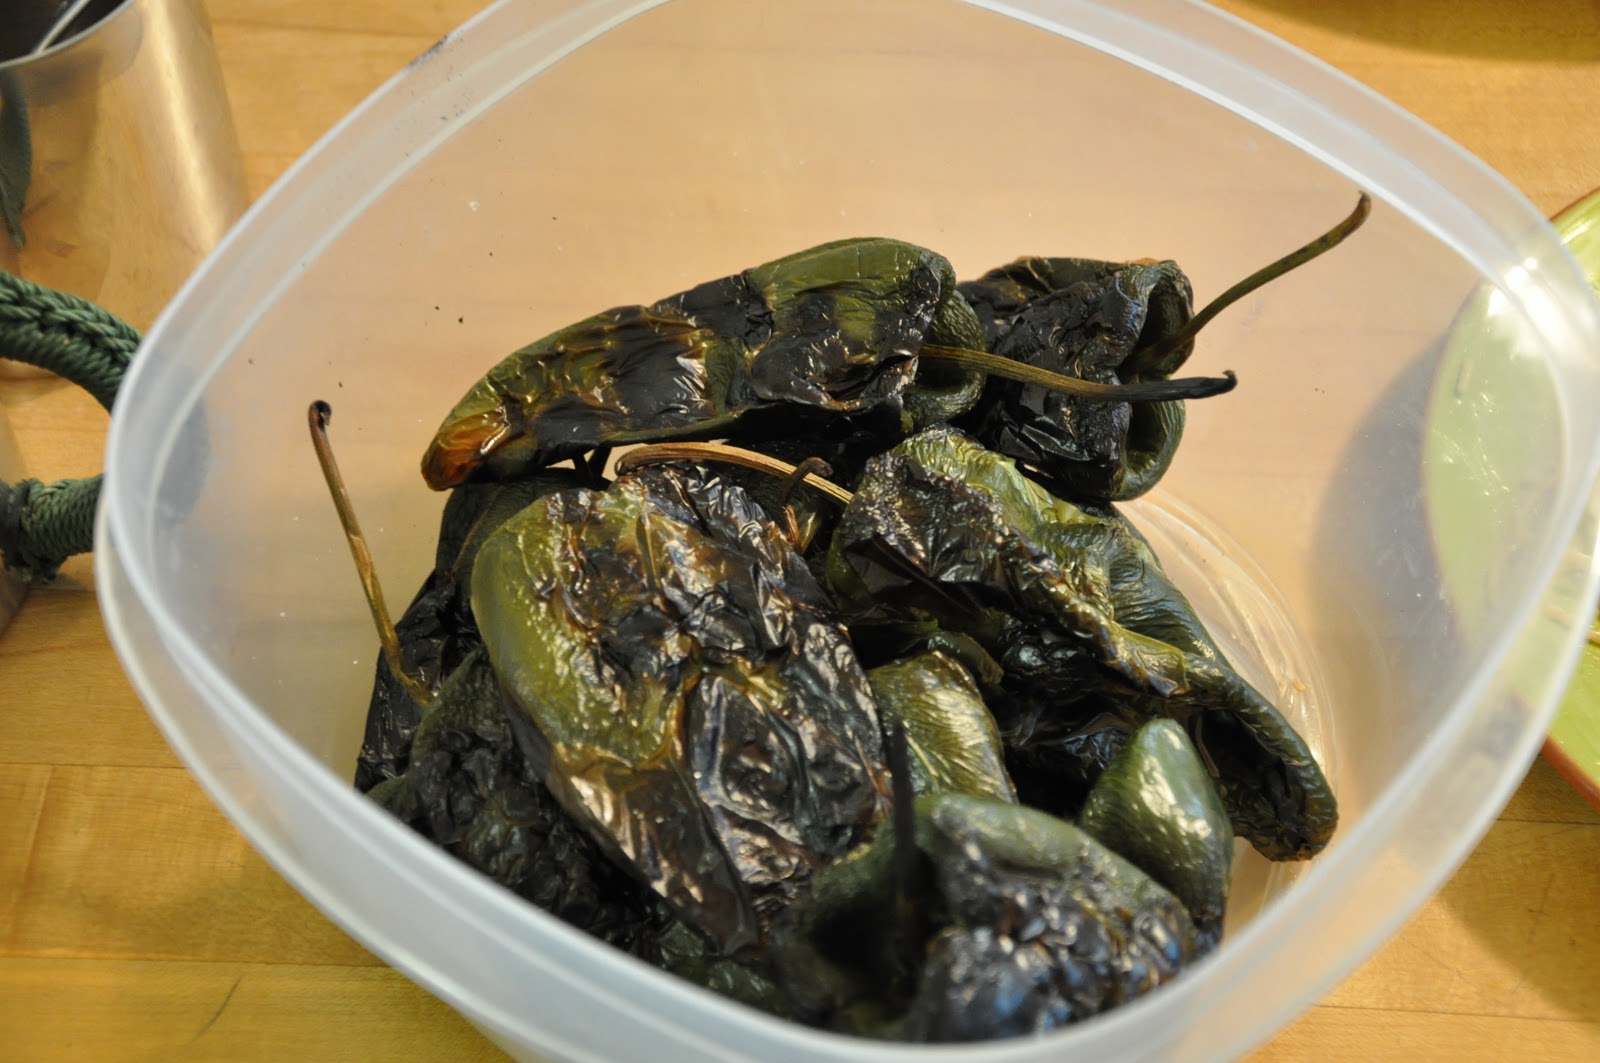
You need to remove the skin of the pepper, but first you must blacken them to get the skin off.
Fire up your grill and roast the peppers until all the skin is black, if you don't have a grill a large pan with high heat will also work just as well.
Now that your peppers are all black you need to put them in an airtight container so they can bask in their own steamy heat for at least 10 minutes.
Here are the peppers in the container pre-lid.
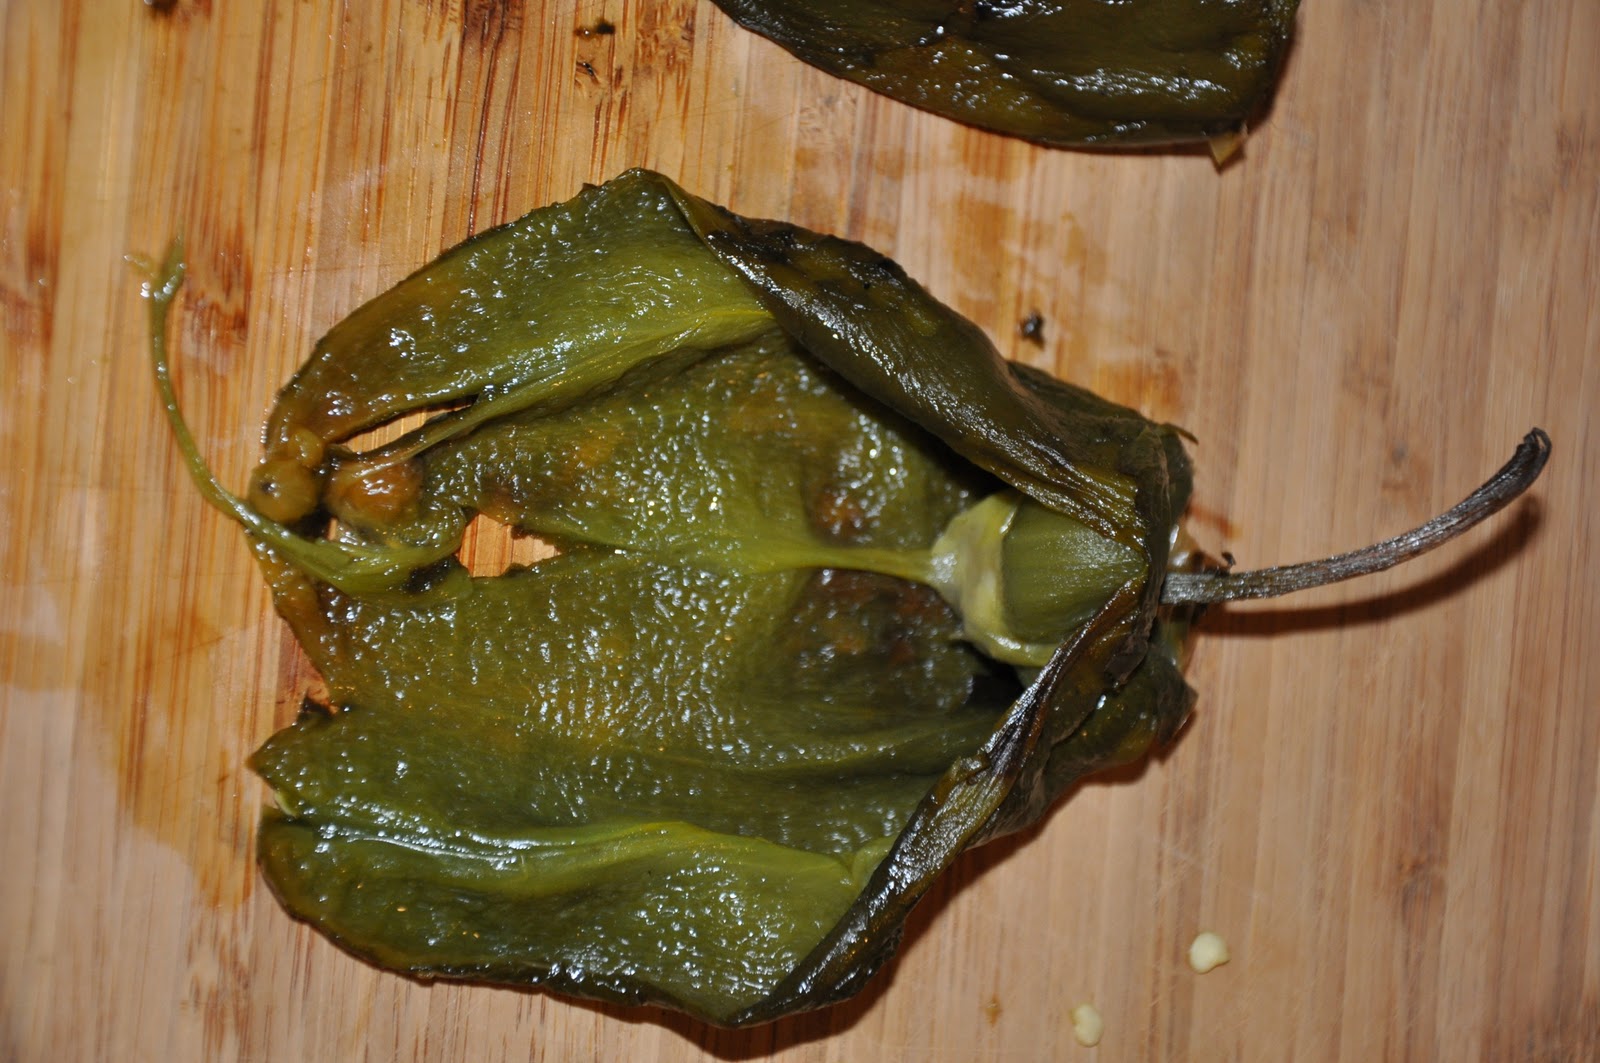
Now that your peppers have sat and are all wrinkled you need to take off their skin. Don't worry about them coming apart as you will see in this photo there is no way to take the next step of getting the seeds out without splitting them open. This is no big deal because when you fry them they will be fused back together. Below you will see a closer view of the pepper after blackening and sitting, skinning, and deseeding.
Now once you pop open your pepper and get the bulk of the seeds out you'll have a few stragglers that can be a pain to get out, but I figured out a great way to remove them. All you have to do is fill a bowl with malt liquor and submerge your pepper, the majority of the seeds will sink and you have a clean pepper.
Really it's just water that was colored by the peppers, but I'm sure malt liquor would work as well.
Now you can make your filling to stuff the peppers. I like to use cheese, rice, meat, and onions. I apologize for the lack of pictures, but all you do is mix your filling together in a pot. It helps if the fillings are cold, that way the fillings will pack into a pellet that will fit right into your peppers. This eliminates the the filling falling out when you are frying the peppers and rolling them in egg and flour.
Now prepare three stations of flour egg flour or if you can masa harina-egg-masa harina. Masa harina is a type of corn flour, but regular white flour works well too.
Always work in the same direction when rolling your stuffed peppers in the stations. It helps if one person can do the rolling and the other can keep an eye on your pan full of hot oil because the hands that do the rolling are going to get filthy. The first round of flour gives the egg something to stick to, and the egg then gives the next round of flour something to stick to.
Place your peppers in carefully so you don't cook yourself and let them sit for about a minute. You can then roll them over so the other side is cooked, or whilst letting them sit you can spoon hot oil on them so you don't even have to turn them. Cooking time is minimal, less than two minutes total.
Now plate your treasure and enjoy with more cheese. These are plated with MutherMusk's famous black bean and lentil soup.
It's a wise idea to make as many as you have time for. They will freeze well after you stuff them. That way when you want some next time you just defrost and fry. Just like in the restaurant.
Cleanup NOTE: I hate to waste things so I make dog treats with the leftover egg and flour. I combine all three stations into one and mix to make little dumplings. Then I put them in the hot oil until they are crispy. After removing them from the oil you can do one of two thing. You can give them to your dog, which I wouldn't advise, or you can put a bit of salt and sugar on them and eat them yourself. I recommend eating them, the salt and sugar go well with the chile flavoured dumplings.