Okay My Little Friend you have nagged me long enough to put this post up. I have usually been against posting a recipe for this because there are so many on the net already why put mine up, but okay.
Here you go.
First get your chic peas, you should get the dry ones, because they are way cheaper and you can control the salt intake. I put mine in the croc pot, cover with water turn on and in the morning they are done. Now here is the secret that no one tells you, you have to put them in the food processor while they are hot.
If you cool them your puree will be chunky. That is it, that is the whole deal.
So strain them and put them in the food processor and process away and yes it is now a processed food so if you care about that stuff get off your high horse or stop reading. If you do not strain them your dip will be soupy, you can always add liquid at the VERY END, i.e. the VERY LAST THING YOU WILL ADD. I generally do not add any I use olive oil because it works better and doesn't separate.
Moving on.
Now comes the fun, you take equal amounts of tahini and olive oil and mix them together in a smaller food processor. This is another one of the tricks I learned about from a food magazine that Father Ox pulled out of the trash and gave to me. This makes it so you do not have to keep track of both you just add the mixture a little at a time until it tastes the way you like it.
Now is when I like to add the lemon juice, and when I say lemon juice I mean fresh squeezed lemon juice not that filth you find in a plastic lemon. If you want to use that filth don't, it is an abomination and if you are going through the effort to make this yourself you might as well do it my way (the right way).
Now that you have added the lemon NOW add the salt, and it doesn't have to be fancy pants salt. You add it to taste however you want. I add it last because I wan the flavor of the dip to be built on the peas, oil, tahini and lemon juice, NOT THE SALT.
If your dip is dry you can add olive oil, I don't care what type you use, whatever makes you feel better about yourself works for me, just as long as I don't have to hear about it.
Now I do not include the amounts of ingredients because I have tried many times to figure it out and it never works even with a scale so you have to use your tongue.
So to recap the essential tricks are make the puree while the peas are hot! hot! hot!
Pre mix the tahini and olive oil.
Add lemon juice (see above for rant)
Add salt for taste and olive oil to smooth out the dip.
Now see if you can convince someone you bought it at the store.
Wednesday, May 20, 2015

Friday, December 13, 2013
Crepes
I have heard you need special pans to make crepes or buy a special stone and you might need to if you're not smart enough to use a regular pan, but if you can't use a regular pan you probably should not be using the stove unsupervised.
Good luck
-
1/2 teaspoon vegetable oil
-
1 cup (5 ounces) unbleached all-purpose flour
-
1 teaspoon sugar, plus 8 teaspoons sugar for sprinkling
-
1/4 teaspoon table salt
-
1 1/2 cups whole milk
-
3 large eggs
-
2 tablespoons unsalted butter, melted and cooled
INSTRUCTIOn
You can oil your pan if you want or use clarified butter if you really want to do the job right. Make sure you heat your pan the whole way before you try making the creep
IN REALITY YOU PROBABLY DON'T NEED TO BUTTER THE PAN IF YOU ARE USING A NON STICKY PAN.
WHILE SKILLET IS HEATING, WHISK TOGETHER FLOUR, SUGAR, AND SALT IN A BOWL. IN A SEPARATE BOWL, WHISK TOGETHER MILK AND EGGS. ADD HALF OF MILK MIXTURE TO DRY INGREDIENTS AND WHISK UNTIL SMOOTH LIKE A CRIMINAL. ADD BUTTER AND WHISK UNTIL INCORPORATED. WHISK IN REMAINING MILK MIXTURE UNTIL SMOOTH LIKE A CRIMINAL.
USE A SMALL AMOUNT OF BATTER TO MAKE SURE YOU HAVE THE PAN AT THE RIGHT TEMP AND COOK A MINI CREEP.
POUR IN BATTER JUST ENOUGH TO COVER MOST OF THE PAN, NOW PICK UP THE PAN AND MAKE THE BATTER ROLL AGAINST THE EDGE TO MAKE IT THIN. COOK UNTIL YOU ARE ABLE TO FLIP THE CREEP. FINISH COOKING ON THE OTHER SIDE AND ENJOY.
MULTIPLY BY 4 FOR FINALS BREAKFAST.
1/2 teaspoon vegetable oil
1 cup (5 ounces) unbleached all-purpose flour
1 teaspoon sugar, plus 8 teaspoons sugar for sprinkling
1/4 teaspoon table salt
1 1/2 cups whole milk
3 large eggs
2 tablespoons unsalted butter, melted and cooled
Wednesday, August 7, 2013
Marshmallows
Homemade try em out, look up America's Test Kitchen on youtube for full instructions.
Add 120g water to 25g (4 packets) gelatin and let sit in mixer bowl.
In a pan bring to boil this mixture 240F or soft ball in candy making.
115g 1/3cup corn syrup
480g 2 cup sugar
120g 1/2 cup water
1/4 tsp salt
Put into blender and put on high until it it warm pour in a 9x13 lined with tinfoil and sprayed with oil.
Add flavor before it cools
4 tbs of cocoa
Let set up over night and coat with mixture of 1part corn starch and 1 part powdered sugar.
Add 120g water to 25g (4 packets) gelatin and let sit in mixer bowl.
In a pan bring to boil this mixture 240F or soft ball in candy making.
115g 1/3cup corn syrup
480g 2 cup sugar
120g 1/2 cup water
1/4 tsp salt
Put into blender and put on high until it it warm pour in a 9x13 lined with tinfoil and sprayed with oil.
Add flavor before it cools
4 tbs of cocoa
Let set up over night and coat with mixture of 1part corn starch and 1 part powdered sugar.
Hummus
Garbanzo Beans drained 425g
Lemond Juice 20g
Tahini 55g
Add other spices
Whole deal is 800 Kcal
Lemond Juice 20g
Tahini 55g
Add other spices
Whole deal is 800 Kcal
Sunday, June 23, 2013
Stacy Thompson Cookies
Finally after years of thinking I posted this I will throw this recipe up.
I'll put photos up before I graduate from Big Red with my MD.
2 Sticks Butter1/4 c sugar
3/4 c brown sugar
2 eggs
1 vanilla pudding mix
1 tsp vanilla
2 1/2 c flour
1 tsp baking powder
1 bag choc chips
I'll put photos up before I graduate from Big Red with my MD.
2 Sticks Butter1/4 c sugar
3/4 c brown sugar
2 eggs
1 vanilla pudding mix
1 tsp vanilla
2 1/2 c flour
1 tsp baking powder
1 bag choc chips
Sunday, June 2, 2013
BUTTERMILK PANCAKE FLAPJACK
I love making pancakes for people, or at least mixing up the batter and having the Wife cook them, which I have recently been schooled on so I can do it. I can't count the times I have been without my recipe and have to search the inter webs for it, so I have posted it on my blog where I can find it while traveling.
I used to have a waffle recipe that involved whole wheat flour, but when I had some pancake batter left over I made a waffle with it and thought it was better than the waffle recipe so I now use pancake batter for both.
Here are the instructions for making them.
First of all, if you don't have buttermilk go buy some, or you can ruin the pancakes by trying to substitute with other substances. Dry buttermilk is nasty for this, go buy some. Vinegar and milk doesn't work either, go buy the real deal or just stop reading this now.
IF YOU DON'T HAVE FULL FAT BUTTER MILK GO BUY SOME!!!
Mix Wet (All ingredients should be at room temp, eggs, milk) melted butter
Mix Dry Separately
Fold Dry into Wet, you want a lumpy consistency, which is why you don't mix them, YOU FOLD THEM.
LET ME SAY THAT AGAIN, FOLD THEM TOGETHER, don't mix out all the lumps or you'll ruin them like he who shall remain nameless did.
Now let the batter sit for a MINIMUM of 15 minutes.
Your batter should still be lumpy, ITS OKAY, it is SUPPOSED TO BE!
If you're batter isn't lumpy you've ruined it and the pancakes won't rise.
Now you throw the batter on the griddle and make flapjacks.
I used to have a waffle recipe that involved whole wheat flour, but when I had some pancake batter left over I made a waffle with it and thought it was better than the waffle recipe so I now use pancake batter for both.
Here are the instructions for making them.
First of all, if you don't have buttermilk go buy some, or you can ruin the pancakes by trying to substitute with other substances. Dry buttermilk is nasty for this, go buy some. Vinegar and milk doesn't work either, go buy the real deal or just stop reading this now.
IF YOU DON'T HAVE FULL FAT BUTTER MILK GO BUY SOME!!!
Mix Wet (All ingredients should be at room temp, eggs, milk) melted butter
Mix Dry Separately
Fold Dry into Wet, you want a lumpy consistency, which is why you don't mix them, YOU FOLD THEM.
LET ME SAY THAT AGAIN, FOLD THEM TOGETHER, don't mix out all the lumps or you'll ruin them like he who shall remain nameless did.
Now let the batter sit for a MINIMUM of 15 minutes.
Your batter should still be lumpy, ITS OKAY, it is SUPPOSED TO BE!
If you're batter isn't lumpy you've ruined it and the pancakes won't rise.
Now you throw the batter on the griddle and make flapjacks.
4 cups all-purpose flour
2 teaspoon baking powder
1 teaspoon baking soda
2 teaspoon salt
6 tablespoons sugar
5 large eggs
4 cups buttermilk (at room temperature)
1 stick butter melted
Note to self, this recipe is doubled.
Multiply the current recipe as written by 2.5 for a group of 20.
Saturday, April 20, 2013
I Won't Take the Credit
I had some time between exams and tried this out.
This woman is awesome, and so is this drink. It's one of those things in life that is worth the hassle, but it is not really that much of a hassle to make.
Check out her other videos too, they're amazing.
Saturday, January 7, 2012
Whipped Cream
Once you make this yourself you'll never go back to that nasty air puffed drivel.


INGREDIENTS:
VANILLA EXTRACT
HEAVY WHIPPING CREAM
SUGAR
First pour your whipping cream into the mixer and start it a mixing on hight. Wait until it starts whipping up and then add vanilla to taste and sugar to taste.
When adding sugar it is imperative that you sprinkle it in VERY slowly.
If you don't your sugar will fall to the bottom and will not be incorporated.
Don't over whip the cream or it may fall and you will get butter, but that shouldn't happen unless you walk away and leave the mixer on high for several minutes. If that happens you'll have to start over but at least you'll have some delicious butter and sweet vanilla buttermilk.
Now that you're an expert whipper, you'll never go back to the air whipped nasty at the coffee shop, which in all honesty is fine for coffee but not suitable for pie.
Key Lime Pie with Raspberry Sauce
I never knew how many people love this stuff until I started making it.
I had heard of KLP but never really seen any that looked good enough to try. They were all green and slimy and think looking which dissuaded me trying them, so I thought I would look into it for myself.
The first thing I learned is that KLP is made with key lime juice, now a key lime is different from a persian lime in that it is much smaller, less juicy, and more expensive. I have made pies with both and can not tell the difference. If you can good for you, don't eat my pie, but we can both agree KLP should be yellow. Yes I said yellow, that is because a bowl of lime juice is yellow and not green. If I am presented with a green KLP I will turn my nose, or at least give the maker an education so they can stop embarrassing themselves, and picking people with food coloring.
I also learned while living in Kodiak, Alaska that you can make this pie with equal results using your everyday lemon if limes are unavailable.
Folks are often surprised by how easy this pie is to make.
INGREDIENTS:
6-8 Persian Lime, or a bag of Key Limes
2 cans sweetened condensed milk
6 egg yolks
1 box of Graham crackers
First Let us start off with making the crust, an easy task. You can buy your Graham crackers already crusted but I prefer to do it myself with the KitchenAid. I used to smash them in a plastic bag, but always ended up with lumps and broken bags leaking crumbs. With the KitchenAid food grinder I get perfect powder every time.
Here is another horrible thing when dealing with Graham cracker recipes. No one ever clarifies what they mean. Well when I say you need 25 of these for a crust you know what I mean. Yes, 25 is a lot, but you don't want your crust to be too thin.


Melt your butter (by cutting it into small chunks first, so it doesn't explode in the microwave) and pour it in the crumbs.

Mix it until it looks like this.

Shape is until it looks like this.

Set your crust aside and prepare to smash some citrus.
This is how I do it. I used to just squeeze the lime, but this is much faster and less work. Plus I get to use the the RedHead.
Ta Daaa! A whole effortless bowl


I know, there are more than six eggs but I'm making more than one pie.


The Great Dr. PhD told me of a storied sauce he likes to top his pie with. RASPBERRIES!
You need sugar and raspberries you figure out the rest.


Put it on the pie and enjoy, or top with whipped cream. You can see that post for making it yourself. If you put store bought whipped nasty on your pie don't ever read this blog again, it's over your head

I had heard of KLP but never really seen any that looked good enough to try. They were all green and slimy and think looking which dissuaded me trying them, so I thought I would look into it for myself.
The first thing I learned is that KLP is made with key lime juice, now a key lime is different from a persian lime in that it is much smaller, less juicy, and more expensive. I have made pies with both and can not tell the difference. If you can good for you, don't eat my pie, but we can both agree KLP should be yellow. Yes I said yellow, that is because a bowl of lime juice is yellow and not green. If I am presented with a green KLP I will turn my nose, or at least give the maker an education so they can stop embarrassing themselves, and picking people with food coloring.
I also learned while living in Kodiak, Alaska that you can make this pie with equal results using your everyday lemon if limes are unavailable.
Folks are often surprised by how easy this pie is to make.
INGREDIENTS:
6-8 Persian Lime, or a bag of Key Limes
2 cans sweetened condensed milk
6 egg yolks
1 box of Graham crackers
First Let us start off with making the crust, an easy task. You can buy your Graham crackers already crusted but I prefer to do it myself with the KitchenAid. I used to smash them in a plastic bag, but always ended up with lumps and broken bags leaking crumbs. With the KitchenAid food grinder I get perfect powder every time.
Here is another horrible thing when dealing with Graham cracker recipes. No one ever clarifies what they mean. Well when I say you need 25 of these for a crust you know what I mean. Yes, 25 is a lot, but you don't want your crust to be too thin.

Now comes the butter. I like to use a stick and a half for each crust.

Melt your butter (by cutting it into small chunks first, so it doesn't explode in the microwave) and pour it in the crumbs.

Mix it until it looks like this.

Shape is until it looks like this.

Set your crust aside and prepare to smash some citrus.
This is how I do it. I used to just squeeze the lime, but this is much faster and less work. Plus I get to use the the RedHead.
Ta Daaa! A whole effortless bowl

Now for the filling.
Crack your eggs in a bowl and then pull the yolks out and put those yolks in with the sweetened condensed milk, or separate however you want.

I know, there are more than six eggs but I'm making more than one pie.

Now whip them into one delicious liquid. After they are combined pour your lime juice in and watch the acidity of the lime curdle the sweetened condensed milk. Don't resist the urge to taste it, I always do and I am yet to die.
Now pour this into the crust, put it in a preheated oven of 350F for 20 minutes, and chill before serving.

The Great Dr. PhD told me of a storied sauce he likes to top his pie with. RASPBERRIES!
You need sugar and raspberries you figure out the rest.


Mexican Deviled Eggs

Insert mexican hat dance.
How did I end up with "Mexican" deviled eggs? Well, we have had "Mexican" food for Thanksgiving for the past few years. I look forward to Satanic Eggs each fall, but realized that without traditional Thanksgiving food I was stuck, so this year I decided to slip them in. I went to the interweb and looked for a recipe and found lots of recipes that contained everything for regular Satanic Eggs with the addition of jalapenos.
I wasn't surprised by the laziness of these recipes so I made my own.
FIRST boil a load of eggs, peel, cut in half, and remove yolk.
Now mix the yolks in a bowl with the follwoing.
minced onion
minced cilantro
Valentino or Chalula sauce
Sour Cream
Chile Powder
minced tomato
minced garlic
adobo
salt
Next take one pickled jalapeno and place it in the hollow egg white. Then fill the egg with the yolk mixture. Don't tell your guests of the jalapeno, because it makes for great conversation. Put a big fat black olive on top. Finally sprinkle with paprika and cayenne pepper. Again, no need to mention the cayenne pepper.
Monday, December 5, 2011
Cream Cheese Frosting
Sadly I have come to realization that there is no frosting that you can buy at a grocery store that is worth eating. I remember as a kid my aunt coving Graham crackers in white glaze and sending me happily on my way to sugar land, but as I have gotten older I just can't stand the stuff. So, I tried to do it myself and the results were spectacular.
Plus, the end product is easier to spread on whatever you may like than the store bought. Seriously, that stuff is like spreading plumbers putty.
INGREDIENTS
Cream Cheese 8oz
Unsalted Butter 1 stick
Powdered Sugar
Vanilla 1 TEAspoon
The first and most important step is to let the cream cheese and butter sit out long enough to reach room temperature. Overnight is your best bet, and contrary to what the germ police might have to say butter and cream cheese do fine if you leave them out overnight. Now, if you try to heat them up quickly so you don't have to wait go for it, but when you have melted butter and cream goo, just remember OVERNIGHT is your best bet. I always use unsalted butter, because I hang with some people who can't handle their salt (me included) I'm sure salted butter will work just as well.
For a double decker 9" cake I triple the recipe above.
Now put your butter and cream cheese into a mixing bowl and combine. You can use a wooden spoon, but I prefer to use my KitchenAid hand mixer, don't try this in the KitchenAid stand mixer, it's a nightmare.
The next step is to add the vanilla and powdered sugar. I have seen some recipes call for a whole cup of powdered sugar, but I like to add a lot less than that. I like to be able to taste the cream cheese, but whatever floats your boat.
Congratulations you are now the proud new owner of an off-white wonder!
Spread this on a cake, cookies, waffles, pancakes or even just your fingers and enjoy!
If you want to get picky about the icing/frosting debate have a read here:
http://www.seriouseats.com/2009/01/icing-vs-frosting-glaze-debate.html
This is frosting.
Plus, the end product is easier to spread on whatever you may like than the store bought. Seriously, that stuff is like spreading plumbers putty.
INGREDIENTS
Cream Cheese 8oz
Unsalted Butter 1 stick
Powdered Sugar
Vanilla 1 TEAspoon
The first and most important step is to let the cream cheese and butter sit out long enough to reach room temperature. Overnight is your best bet, and contrary to what the germ police might have to say butter and cream cheese do fine if you leave them out overnight. Now, if you try to heat them up quickly so you don't have to wait go for it, but when you have melted butter and cream goo, just remember OVERNIGHT is your best bet. I always use unsalted butter, because I hang with some people who can't handle their salt (me included) I'm sure salted butter will work just as well.
For a double decker 9" cake I triple the recipe above.
Now put your butter and cream cheese into a mixing bowl and combine. You can use a wooden spoon, but I prefer to use my KitchenAid hand mixer, don't try this in the KitchenAid stand mixer, it's a nightmare.
The next step is to add the vanilla and powdered sugar. I have seen some recipes call for a whole cup of powdered sugar, but I like to add a lot less than that. I like to be able to taste the cream cheese, but whatever floats your boat.
Congratulations you are now the proud new owner of an off-white wonder!
Spread this on a cake, cookies, waffles, pancakes or even just your fingers and enjoy!
If you want to get picky about the icing/frosting debate have a read here:
http://www.seriouseats.com/2009/01/icing-vs-frosting-glaze-debate.html
This is frosting.
Thursday, November 17, 2011
Chile Rellenos
THIS POST HAS BEEN EDITED AS OF 1/7/2012
I found this great video from a wonderful woman who has great videos that will teach you how to make real Mexican food. Please see this video on how the bread the Chiles, I have left the way I do it in so you can choose which one you want to try. I am yet to try this new method, but will likely switch to it as it makes much less of a mess.
WARNING: Careful where you put your hands while making this, and if you can wear gloves.
Have you ever been to a mexican restaurant and ordered one of these?
Well, let me back up.... way back in graduate school I had the opportunity to go to Mexico to look at the overwintering site of the Monarch butterfly. Yeah, it was amazing and you should do it if you get a chance, but let me tell you what else was awesome. THE FOOD!! I specifically recall this dish I tried for the first time called the chile relleno (pronounced ray-ay-no). It was amazing so naturally when I gat back to states I wanted to eat another. I ordered one in a local "mexican" restaurant and thought it was alright but not as good as the one I had in mexico. I thought I would just go to another restaurant and see if they had better ones. A few tries later at different restaurants had me confused because no matter where I went they were all eerily the same. So I went to Mexican food mecca, Mi Cabanita to get one, but they don't sell them.
I knew something was wrong! If the Cabanita doesn't sell it you usually don't want it, but I wanted one so of course I would just have to do it myself.
I enlisted the help of Dr. Chiro and MutherMusk and after a few attempts I have ironed out the details of making the chiles, which are almost as good as the one I had in Mexico.
Now back to the eerily similar chiles I was getting in restaurants. Once I figured out how long it took to make these (they are worth the effort) I realized the ones in the restaurants are frozen. They are made in a factory somewhere! This epiphany explained why they were all the same no matter where I went.
Here is a list of ingredients.
Poblano Peppers
Your favorite frying oil
Your favorite rice
Onions
Your favorite meat
Masa Harina or just plain old flour
Your favorite cheeses
The lion's share of the work is done in prepping the peppers so prepare yourself.
You need to remove the skin of the pepper, but first you must blacken them to get the skin off.
Fire up your grill and roast the peppers until all the skin is black, if you don't have a grill a large pan with high heat will also work just as well.

Now that your peppers are all black you need to put them in an airtight container so they can bask in their own steamy heat for at least 10 minutes.
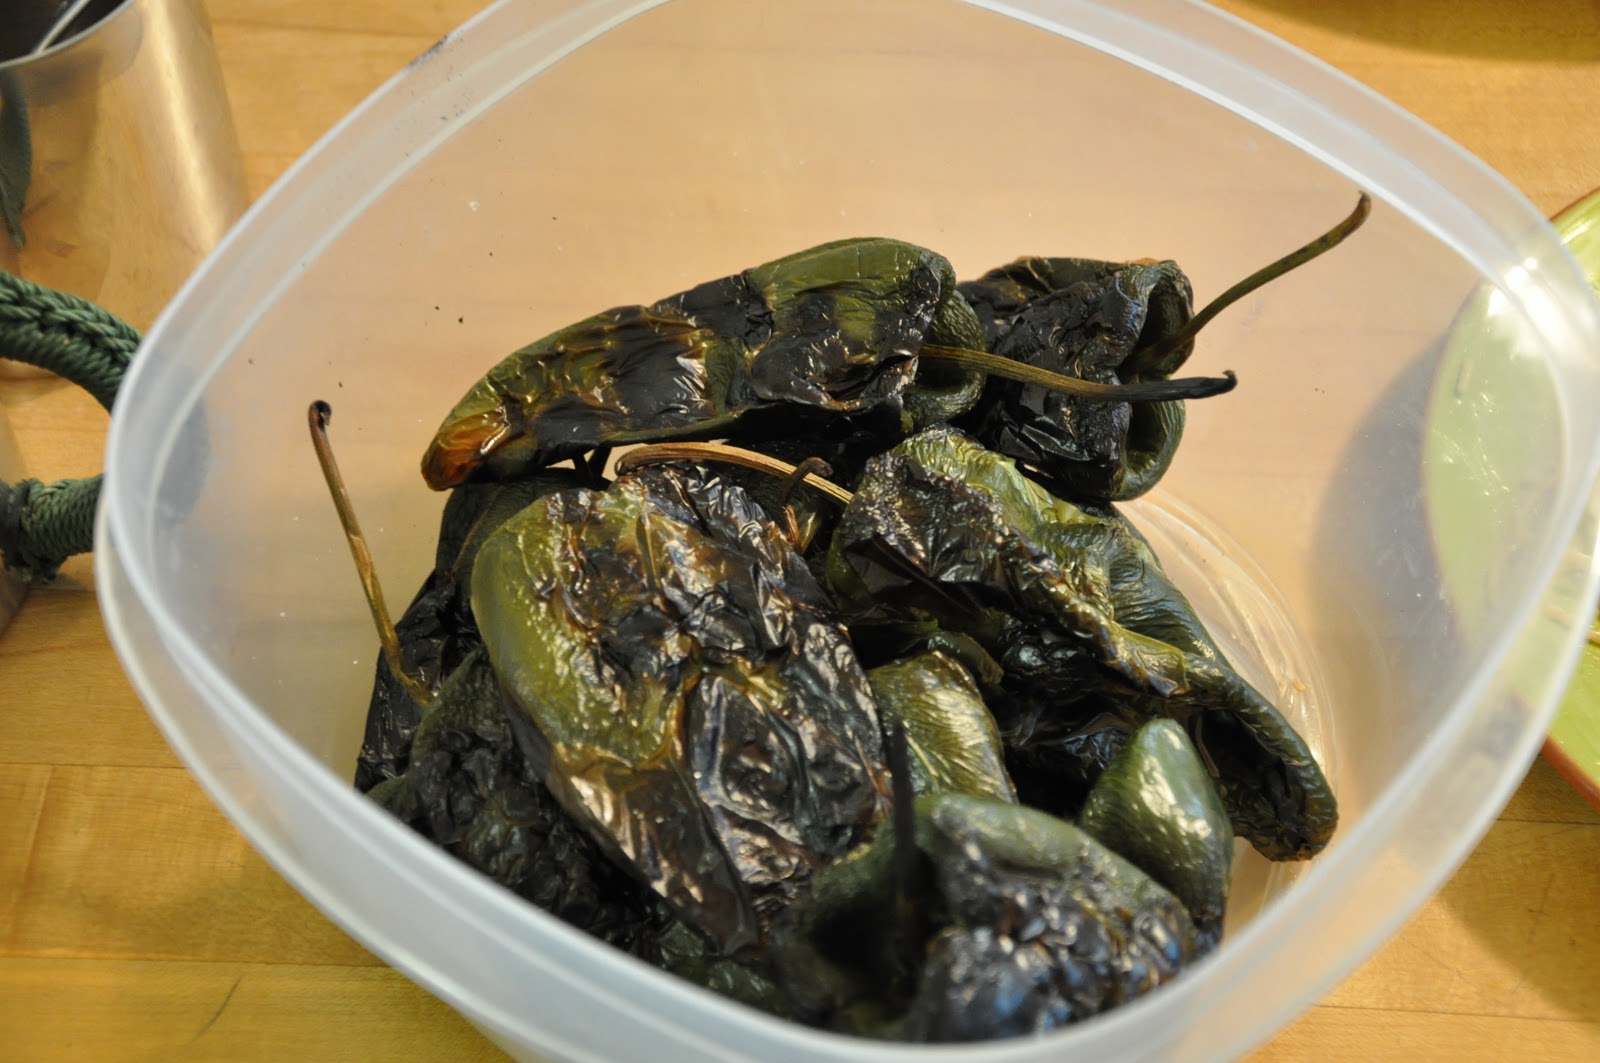
Here are the peppers in the container pre-lid.

Now that your peppers have sat and are all wrinkled you need to take off their skin. Don't worry about them coming apart as you will see in this photo there is no way to take the next step of getting the seeds out without splitting them open. This is no big deal because when you fry them they will be fused back together. Below you will see a closer view of the pepper after blackening and sitting, skinning, and deseeding.


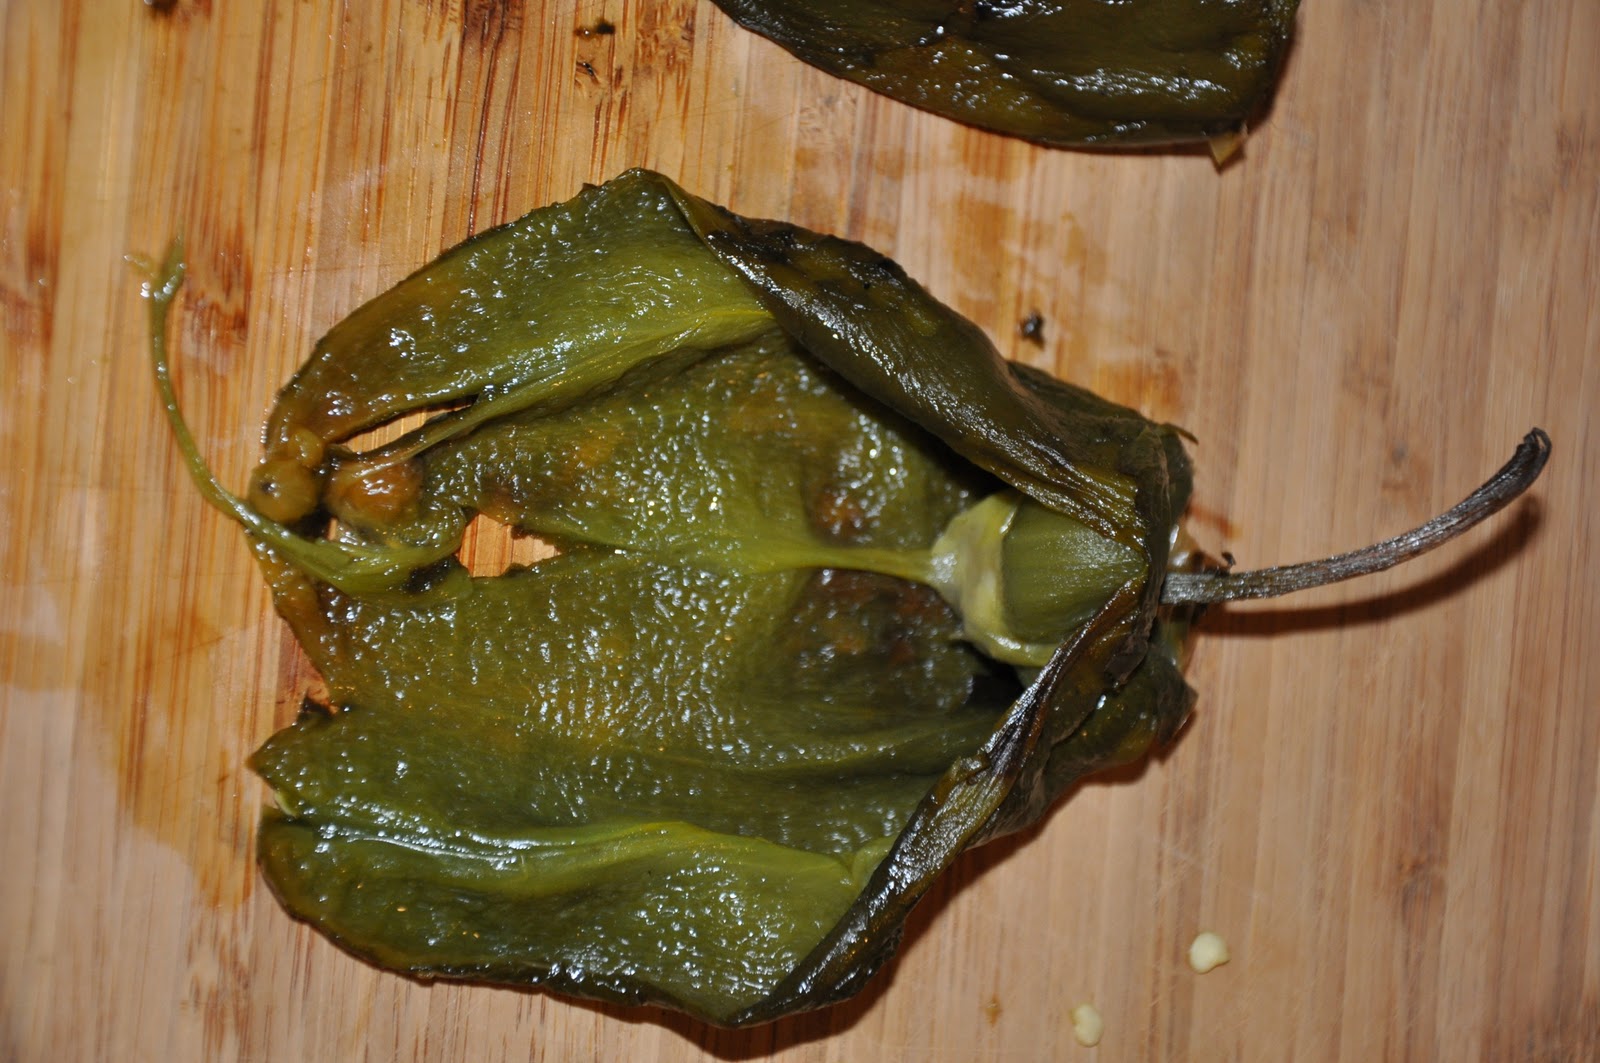

Now you can make your filling to stuff the peppers. I like to use cheese, rice, meat, and onions. I apologize for the lack of pictures, but all you do is mix your filling together in a pot. It helps if the fillings are cold, that way the fillings will pack into a pellet that will fit right into your peppers. This eliminates the the filling falling out when you are frying the peppers and rolling them in egg and flour.
Now prepare three stations of flour egg flour or if you can masa harina-egg-masa harina. Masa harina is a type of corn flour, but regular white flour works well too.

Always work in the same direction when rolling your stuffed peppers in the stations. It helps if one person can do the rolling and the other can keep an eye on your pan full of hot oil because the hands that do the rolling are going to get filthy. The first round of flour gives the egg something to stick to, and the egg then gives the next round of flour something to stick to.

Place your peppers in carefully so you don't cook yourself and let them sit for about a minute. You can then roll them over so the other side is cooked, or whilst letting them sit you can spoon hot oil on them so you don't even have to turn them. Cooking time is minimal, less than two minutes total.

Now plate your treasure and enjoy with more cheese. These are plated with MutherMusk's famous black bean and lentil soup.
It's a wise idea to make as many as you have time for. They will freeze well after you stuff them. That way when you want some next time you just defrost and fry. Just like in the restaurant.

Cleanup NOTE: I hate to waste things so I make dog treats with the leftover egg and flour. I combine all three stations into one and mix to make little dumplings. Then I put them in the hot oil until they are crispy. After removing them from the oil you can do one of two thing. You can give them to your dog, which I wouldn't advise, or you can put a bit of salt and sugar on them and eat them yourself. I recommend eating them, the salt and sugar go well with the chile flavoured dumplings.

Monday, October 31, 2011
Irish Soda Bread
Irish Soda Bread
This bread was a request of my wife. I had only had this at the Irish Lion in Bloomington IN and I did not care for it at all. In fact I didn't even bother eating any of the first loaf I made, but everyone loved it and my curiosity got the best of me so I tried it and seemed to enjoy it. Much like greek yogurt the name irritates me. There is nothing particularly Irish about this bread, because it is not green, so I don't know why people love to add the Irish, but I'll call it that for the blog. I just call it soda bread.
Gather these ingredients.
This bread was a request of my wife. I had only had this at the Irish Lion in Bloomington IN and I did not care for it at all. In fact I didn't even bother eating any of the first loaf I made, but everyone loved it and my curiosity got the best of me so I tried it and seemed to enjoy it. Much like greek yogurt the name irritates me. There is nothing particularly Irish about this bread, because it is not green, so I don't know why people love to add the Irish, but I'll call it that for the blog. I just call it soda bread.
INGREDIENTS:

Gold Medal 5
Cups
Better for Bread
Baking Soda 1 TEAspoon
Salt ½ TABLEspoon
Honey 3 TABLEspoons
Egg 1 Large
Buttermilk 1
½ Cups
Butter 4
TABLEspoons (melted)
Raisins 1
Cup
First thing to do is the set your oven to 325 F. This may seem a bit low for bread, but this is a wet bread and it must be cooked slower and longer than most.
Next put all your dry ingredients into a bowl and combine. I like to use a whisk, but you can use whatever you like.
Next gather your wet ingredients and add the honey, egg, and buttermilk to the dry ingredients. Don't worry about over kneading the dough. Once you get it all together melt your butter in the microwave. I like to cut mine into small pieces before microwaving to avoid having the butter explode instead of melting.
Some people like to drink the buttermilk which is nasty. I can still remember an uncle who used to try to get me to drink it. YUCK! I still can't help myself because every time I buy a half gallon I always drink some, just to see if my taste for it has changed. It hasn't.

I am lazy so I use the good ole fashioned dough hook on the KitchenAid to get my ingredients all together. After adding the butter you can add raisins, or any other dried fruit if you want. Sometimes I do and sometimes I don't and sometimes I just forget. Some say adding raisins is not something the Irish do, but this is my blog and Mother Musk likes her dried fruit.

Like I said before the dough is quite wet when it is ready, but you can always add a bit more flour to soak up moisture if you want. The picture above is what you're aiming for.

If you want you can make slices in the bread before you bake it, but I prefer to have mine crack naturally. You check this loaf like a cake by poking it with a toothpick. Remember low and slow for this one. If you cook it too quickly the outside will burn or be done while the inside is still raw. I bake the loaf for an hour and then check it every ten minutes.
If you're unsure about the loaf being done all the way through cut it in half to check. If it's not done just put it back in until it's ready.
Also you should use a straight edged knife to cut this bread. If you use a bread knife it will make thousands of crumbs and rip the bread.
I found this out the hard way.
First thing to do is the set your oven to 325 F. This may seem a bit low for bread, but this is a wet bread and it must be cooked slower and longer than most.
Next put all your dry ingredients into a bowl and combine. I like to use a whisk, but you can use whatever you like.
Next gather your wet ingredients and add the honey, egg, and buttermilk to the dry ingredients. Don't worry about over kneading the dough. Once you get it all together melt your butter in the microwave. I like to cut mine into small pieces before microwaving to avoid having the butter explode instead of melting.
UNDER NO CIRCUMSTANCES SHOULD YOU EVER SUBSTITUTE ANYTHING FOR BUTTERMILK
Some people like to drink the buttermilk which is nasty. I can still remember an uncle who used to try to get me to drink it. YUCK! I still can't help myself because every time I buy a half gallon I always drink some, just to see if my taste for it has changed. It hasn't.


Like I said before the dough is quite wet when it is ready, but you can always add a bit more flour to soak up moisture if you want. The picture above is what you're aiming for.

If you want you can make slices in the bread before you bake it, but I prefer to have mine crack naturally. You check this loaf like a cake by poking it with a toothpick. Remember low and slow for this one. If you cook it too quickly the outside will burn or be done while the inside is still raw. I bake the loaf for an hour and then check it every ten minutes.
If you're unsure about the loaf being done all the way through cut it in half to check. If it's not done just put it back in until it's ready.
Also you should use a straight edged knife to cut this bread. If you use a bread knife it will make thousands of crumbs and rip the bread.
I found this out the hard way.
Tuesday, September 27, 2011
Sweet Potato Fries
Do you like sweet potato fries?
I do!
I like the way they taste, so I eat them.
What I mean by that is my liking them is not based on pretentiousness. I could give a handful of clams if they are "healthy for you" and taste great. Whenever I hear someone talk about how things are healthy and taste great I can't think of a single unhealthy thing that doesn't taste great/er. Healthy is a terrible excuse to eat something, or it's really just another way of saying I'm more sophisticated than you are because I can cram this crap in my gullet with smile on my face.
I actually like them so I eat them and I would like to share with you a recipe that Mother MuskOx makes.
RECIPE:
Gather these spices: corriander seed, cumin, curry, powdered garlic and ground ginger.

 Here is the part Mother MuskOx is great at, seasoning to taste. I can hardly stand to add pepper without a measuring cup, but she doesn't hesitate to eyeball anything. After you season them to taste drizzle a bit of olive oil all over and stir it up.
 After you toss your spices on preheat your oven to 450F. Then place your taters on a baking sheet. This one has holes in it, I know you can't see them, but it does and they are magic. This special baking sheet does something and makes the fries crispier than a plain sheet. We tried a regular sheet because this one was dirty and were disappointed. I don't understand, we should have washed it.
 Put these in for about 15 minutes and then flip them. Let them cook another 10 minutes or so, until they are crispy and before they completely char. We like em' a little dark. Again, you'll have to learn your own oven.

Alas, David Allen Coe-slaw, avocado, sweet potato fries, and catfish.
The cadillac of fish.
I do!
I like the way they taste, so I eat them.
What I mean by that is my liking them is not based on pretentiousness. I could give a handful of clams if they are "healthy for you" and taste great. Whenever I hear someone talk about how things are healthy and taste great I can't think of a single unhealthy thing that doesn't taste great/er. Healthy is a terrible excuse to eat something, or it's really just another way of saying I'm more sophisticated than you are because I can cram this crap in my gullet with smile on my face.
I actually like them so I eat them and I would like to share with you a recipe that Mother MuskOx makes.
RECIPE:
Gather these spices: corriander seed, cumin, curry, powdered garlic and ground ginger.

Next skin your taters with a KitchenAid peeler, or any other brand you might have.


Alas, David Allen Coe-slaw, avocado, sweet potato fries, and catfish.
The cadillac of fish.
Coleslaw Co'sla' Coslawz or David Allen Coe-slaw
Coleslaw can make or break many-a-meal for me, especially when it comes to fish, chicken or any hot meat meal. I have become so fed up with lack luster trash that I'm hesitant to order it at any restaurant. In fact I can't even think of a place I would go and order the coleslaw. If it comes in a tub at the store the only reason I could think of buying it would be to throw at someone or to film a movie involving mock vomit.
In reality, I can rarely resist ordering coleslaw anywhere because I love it so much. It tastes so good, when it's good, but it's rarely any good. So, once again I have tried to do it myself, cementing my dissatisfaction with all other slawz.
If you think you got a recipe, let me have it. I'll try it, but if it sucks I'll spend the money to mail what I don't eat back to you because Mrs. MuskOx's composter doesn't accept bad slaw.
RECEIPE:
Gather these ingredients.

1 Fat Cabbage
Yellow Mustard 1 TABLEspoon
Mayonaise 1/4 Cup
Sugar 1 TABLEspoon
Apple Cider Vinegar 2 Tablespoons
Fresh chopped garlic
6-8 Cups shredded cabbage
When buying a cabbage make sure that it's not rotten, that's all there is to it. Also, I'm cheap and cabbage is sold by the pound so you're best bet is to remove any leaves of the cabbage that are wilted or that you think you might remove after you get home (or after you've bought them). That way you're not wasting your money. Trimming produce in the store may make you feel like an old granny trying to make it on a fixed income, but the employees don't care. The company doesn't care, as long as your happy you'll keep coming back, which means they're happy so DON'T BUY IT IF YOU'RE GOING TO THROW IT AWAY!
Now for the mustard, I like French's yellow mustard. It's a bit more at the store but I like the taste, and if you think it doesn't taste any different than the store brand go ahead and get that. Just don't tell me how it tastes the same and costs less, cause it doesn't.
I might suggest playing with the mustard, but one should never mess with the Mayo. I use Hellmann's because it's actually made in Hell, by the Devil himself and tastes like Heaven. Again, if you like something else go for it, but I recently learned Kraft mayo is runny compared to Hellman's, and you won't find Dale Earnhardt Jr. on a Kraft jar of mayo.
Why is he on the Hellman's jar you may ask?
Because nothing goes together like mayo and NASCAR, that's why!
Sugar, I use white. If you have a beef with white refined delicious all American sugar get over yourself.
Vinegar, any will do, but garlic not so fast. You need fresh garlic. I peel a lot of cloves and grind them. Then I freeze them, because that minced garlic stuff you buy in a big jar has no flavour. It's like spelling the word flavour without the "u".
No flavour!
Now you need to shred your cabbage. As you see here I have elected to demonstrate the way I used to make slaw with my old KitchenAid tater peeler, but wait what is that lurking behind the tater peeler?
That would be the blade to my other KitchenAid device. The slicer shredder attachment which will make shredded splendor out of a head of cabbage, or your fingers, in no time flat.

You can use the tater peeler but I like to use this thing.
Ahh, shredded splendor!

Now you have two choices you can mix up all these ingredients before you add it to the shredded cabbage or you can add it right into the bowl. As for me, I just add it into the bowl and flip on the KitchenAid mixer. This helps push the water out of the shredded cabbage so your slaw is not dry. You may have initially been concerned that my sauce recipe was lacking in liquidity, but the majority of slaw liquid comes from the broken cabbage cells.
The mixer is on the first setting, I just didn't bother to increase my shutter speed.
The mixer is on the first setting, I just didn't bother to increase my shutter speed.

Finally I like to chill the slaw before eating it, and top it off with a bit of Sriracha, or rooster sauce if you please. This meal consisted of David Allen Coe-Slaw, sweet potato fries, avocado and catfish. It's the cadillac of fish!

References Cited:
http://en.wikipedia.org/wiki/Coleslaw
Sunday, September 25, 2011
Greek Yogurt
THIS POST HAS BEEN EDITED AS OF 1/7/2012 SEE BELOW:
EDIT
In the pictures below I recommend using an old shirt for straining. I have finally invested in a yard of unbleached muslin from the store (Hobby Lobby or Jo Anne Fabrics). When buying muslin go for the heavier coarser stuff that is twice as expensive as the lighter stuff. It runs 5.99 a yard, but take a coupon and get a yard for way less. The advantage of the muslin is that it's size makes tying it off much easier, it's easier to clean than the shirt and the larger weave lest the whey come out much faster than the tight knit of the shirt.
END EDIT
Are you tired of store bought yogurt that has the consistency and flavour of snot?
Well, I've got the solution.
My Greek Yogurt!
I think a more appropriate name would be strained yogurt, because there is nothing "Greek" about it.
Before we get started let me tell you that I hated yogurt until I tried plain Greek Gods yogurt. That stuff with fruit at the bottom always reminded me of dog vomit, so I was opposed to it. Next, my foray into vanilla yogurt was another flop, I think because it tasted nothing like vanilla anything. Then it was on to fat free, not only was there no flavour the texture was like runny Jell-O, but then I tried the Greek Gods and was hooked. Then next step of my relationship of yogurt was to figure out how to make it myself and after many YouTube videos and a couple trial batches and a tasting by the official MuskOxMaven Test Piggies, I present to you my recipe.
FIRST A FEW NOTES
TEMPERATURE IS MOST IMPORTANT IN THE MAKING OF YOGURT SO DON'T STRAY FROM MY INSTRUCTIONS
ALSO USE CLEAN DISHES WHEN MAKING YOGURT, YOU DON'T NEED TO STERILIZE JUST MAKE SURE THEY ARE CLEAN.
IF YOU WANT TO KNOW THE COST OF MAKING THIS I ESTIMATE IT TO BE AROUND 4 USD EVEN IF YOU CAN NOT GET YOUR MILK ON SALE. A GALLON WILL MAKE JUST UNDER 2 QUARTS OF YOGURT. A 24 OZ TUB AT THE GROCERY WILL RUN JUST UNDER 4 USD.
IF YOU ADD UP ALL THE TIME IT TAKES TO ACTUALLY HANDLE THE YOGURT WHILE MAKING IT YOU ARE LOOKING AT LESS THAN AN HOUR
Now for the recipe!
Ingredients:
2 Cups Nonfat Dry Milk
1 gallon Whole Milk
First you need to get a gallon of WHOLE MILK.
That's right whole milk, don't try to skip the fat factor, or you'll end up with Elmer's Glue yogurt. It's not as bad as store bought snot, but it's easier to just get glue/snot from the store.
Now that you have your whole milk pour it into pot and bring it up to 160F. Keep it at that temperature for 10 minutes. Keep stirring so the milk doesn't burn to the bottom of the pan. This won't affect the flavour, but it keeps cleanup to a minimum.


Now you're ready for fermentation. I use this fermentation chamber pictured here for my making of yogurt. It consist of a cooler, a heating pad and a towel. The towel is not necessary. I poured my liquid into a KitchenAid stand mixer bowl, because my other pot will not fit in the cooler. I then covered the bowl with plastic wrap. The plastic wrap is handy, because you can poke your thermometer through right into the yogurt to monitor the temperature.
I know that my heating pad will keep the temperature between 100-110F so I don't worry about over heating. If you get the temperature up over 120F or so you'll kill the bacteria from your starter culture and your yogurt will not turn out. You may want to keep an eye on your fermentation vessel the first time through. Since my vessel is tested I just close it and turn the pad on, I don't worry about the temperature. You can also use an oven if yours is fancy and will keep a constant temperature. You'll just have to find out for yourself, I know my oven is not to be trusted with yogurt.
After you close your vessel you let it sit for at least 14 hours. I usually do mine overnight, and my heating pad will only stay on for an hour, but the cooler will keep the temperature up so there is no need to worry. I usually let mine go for 14 hours, longer won't hurt.
You can also let your yogurt sit at room temperature, but this will probably take forever. I use the vessel, if you decide to let it sit at room temperature let me know how it turns out.

Now you have two options, if you like runny yogurt you can stop now or you can strain your yogurt so it is thick and creamy. I don't like snot, so I strain mine. If you like snot you go right ahead and stop now. As for me and my house we will strain our yogurt.
You will need a colander, and a pot to put it in. You will also need a piece of cloth to line the colander with so your yogurt doesn't run through the holes. I use an old shirt I have cut up (I cut the armpits off and just used the mid part of the shirt). Make sure you rinse it out well before you use it, so you don't get laundry detergent in your yogurt. You will also see a bowl with canned goods in it. I'll get to that shortly.


I get just under 2 quarts of yogurt from a gallon of milk.

Nutritional information can be calculated at CalorieCount.com by putting in your ingredients. Serving size is 1/4 Cup, containing 90 KCal.
References Cited:
http://www.youtube.com/watch?v=0jzXUpnz5kc
http://en.wikipedia.org/wiki/Strained_yogurt
Subscribe to:
Posts (Atom)